Blog Archive

Wednesday 21 December 2016

On the up

With the slab laid and cured for a couple of weeks, the shed framing arrived on site.  I acid etched the slab with hydrochloric acid in preparation for an epoxy floor coating to eliminate dust when sweeping.  This will make for easier cleaning up after woodworking.  Even a burnished slab will create dust each time you sweep up.  It will also negate the need to put tiles in the shower area.

Portals were bolted together, and with the assistance of a couple of mates, four of the five frames were stood up.  With conduits and drainage penetrations, it was not possible to square the frames up on the slab, so once up and braced, we racked the frames straight using ratchet straps.

When choosing the shed supplier, quality and ease of construction were the primary considerations.  The shed kits (there are two as the engineering software doesn't cater for anything but rectangles) were sourced from Mordek in Moruya, with the design using Z purlins that are bolted to the frames.  Working solo, this offers the advantage that purlins and girts can be bolted on finger tight on one end, pivoted into place and then bolted, with final adjustments being made to ensure the correct overhang.

As with anything, there have been a few little "gotcha's".  With both kits being manufactured, they turned up with identical labels on members and girts/purlins, and some bits mixed between the kits, and several of the brackets and accessories were also mixed between the kits.  Judicious use of the measuring tape and a small amount of re-work has dealt with this.

With eave heights of 3.2m and the highest point of the skillion at 4.8m, I purchased two 4m rolling scaffolds, these have been worth their weight in gold.  I am certainly getting fitter each day of this project.


While this has been going on, trenches for drainage, electricity, phone and water have been excavated, and the pressure sewer has been installed, and Telstra have finally moved the neighbours phone line.

At this stage I estimate that I will need another week to finish the frame for the 8mx8m frame and install the vermin proofing/toeboards ready to start sheeting.  The skillion section will require another four days, and I will have to seek assistance to lift the 9m C-Section onto the frames, as it could not be built on ground and tilted up as it is higher than it is wide.

My fear of heights is abating slowly, so by the time I am ready to fix the roof sheets I should be able to walk around without my knees knocking.


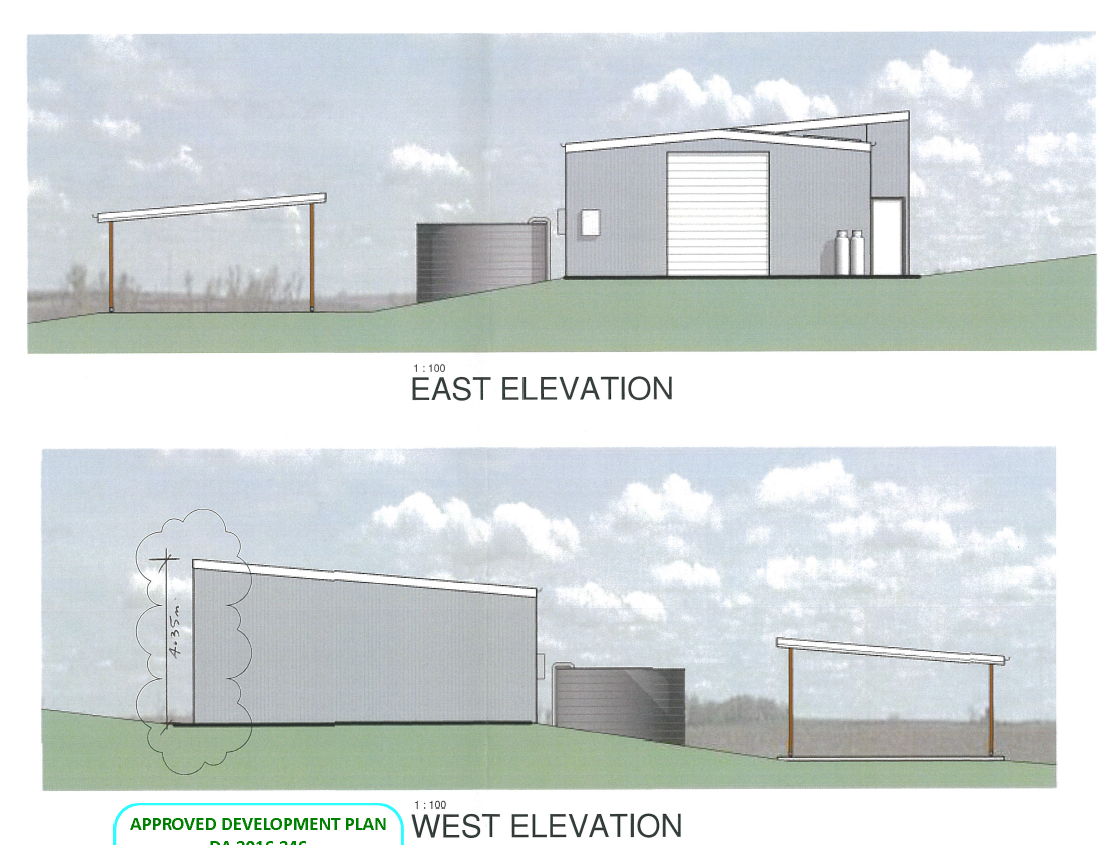
Engineering constraints resulted in a roof pitch of 10 degrees, which brought the peak of the skillion to 4.8m so the structure is a little more imposing than the elevations suggested.

The biggest challenge with this part of the build will be getting 9m lengths of colorbond up onto the skillion.

Monday 28 November 2016

A level surface at last

It is surprising just how much work there is in preparing a slab for the pour.  Once the fill was in and compacted in 100mm layers, then a band of crusher dust, wetted down and compacted.  The waterproof membrane was laid out and sheets of mesh laid on top, then the second layer of mesh specified by the engineer were laid out.  Boxing up was done with yellow tongue flooring ripped into 300 strips and bolted to the blockwork with 6mm masonry self tapping masonry bolts.


As with the footings, I booked the pump for the slab.  A good man on the pump is worth three guys on shovels clearing for the guy on the screed.  Full kudos to Chris from TCR Pumping for a top effort.  My mate Dominic looked after the screed and another mate, Glenn, manned the rake while I followed the pump with the vibrator, trowelled pads at the sides and ran for the level etc.

A minor underestimation on my part saw 14.6 cubic metres of 25 mpa concrete disappear into the slab, a bit more than I had estimated....... at 100m2 5mm of variation in height is .5 metre cubic, guess the gaps in my edge beam were a bit bigger than I had estimated.

Dommo is a legend on the screed, and also on the trowelling machine.  Apart from making it look easy, there is minimal variation on surface height (<5mm) and the surface is exactly what was asked for.


The plan is to grind the concrete and apply an epoxy coating to eliminate dust creation when sweeping.

If all goes to plan I will have portal frames, purlins and beams arrive next week.

Stoked with the slab!

Monday 14 November 2016

Prepping for shed slab

A minor milestone today, plumber attended and underfloor drainage is in.


30 cubic metres of fill in and well compacted.  Crusher dust tomorrow, plastic and mesh, then box up to pour the slab.

Saturday 29 October 2016

The spend continues!

Storage space is always at a premium in my garage, and the current state is approaching critical, but that did not stop us going to the plumbing sales yesterday.

Acquired a budget vanity, 26lpm Gas continuous HW, shower base, Onga pump and water switch and a few other minor odds and sods.  Saved a few bucks and plumber can now set out for slab with confidence.

I like to use Polymarble showerbases, they do not leak and take many years to show signs of wear.  Easy to waterproof to walls.  Luckily they now make a floor pan and sealing system that allows drop in on a concrete slab.
First steps landscaping

I took the opportunity to deal with some potentially manually intensive landscaping activities.

First off was getting rid of a bamboo like horror


This allowed me to salvage the tree ferns the neighbour wanted gone from their garden.


Relocating the driveway also required the moving of some trees and stumps removed


The first tree we attempted to move we managed to ringbark when the sling slid around the trunk, and it is going to die, but the other two may live.

The driveway is now much easier to access, and will make it easier to back the boat into the shed once we are living here.


It certainly made access for the concrete pump easier.  Eventually we will have to put a concrete spoon drain and apron in, but not until machinery is no longer required.

Pressure sewer and stump removal

I mentioned in one of the first posts that we had to remove some trees, and as a result, even wiht the stumps munched, the stumps remained just below ground level.  With Murphy as my architect, the proposed location for the pressure sewer pod required the removal of the large ironbark stump.


After the excavator had dug around the stump and the roots, I dragged out my little Husqvarna 236 and set to cutting the roots off.  The first cut was OK, the second took a little longer, and by the third the little saw was really struggling, so I set it up on a log to run a file over it.

I put my glasses on so I could see, and it then became apparent why the cutting was so slow.  The gravel and rocks in the ironbark roots had ripped off all but five teeth on the chain.  Luckily we got far enough that the excavator could finish the job.


You can see half of the stump in the photo above.  Will deal with the roots when we do the cut for the house.

Footings and piers are in for the shed

I underestimated the amount of work required to manually clean up after the machinery and prep for steel placement.  106 Starter bars were cut and bent, and very grateful for the use of a mates bandsaw and shed for shade.


The jig I made to bend the bars made it much easier, a u-bolt thru a sleeper with a stop block and a piece of pipe for leverage.


After much sweat and muscle soreness, the steel is in, depth pegs all round, steps boxed up and piers cleaned out ready to pour.  The sparky placed his conduits, including a few of spares just in case we ever get NBN by fibre or we decide to do some tricky automation.


Chris from TCR Concrete Pumping set up his pump, and a while later the concrete turned up


This was the first time I have used a pump, and I take my hat off to Chris, there was barely any shoveling involved, he is a top operator.  I followed the pump with the vibrator, and my mate Dommo screeded.  Once again, a pleasure to watch a master of his craft.

All in all we put 12.4 meters of concrete in the ground, with 5.4 in the first truck and 7 in the second.  In between trucks I placed the starter bars at 400mm centres, working to strings on pegs I put in during prep to ensure they are centred and correctly spaced in the blockwork.  I used a 2m piece of 70x35 pine with painted marks at 400 intervals, and just slid it along the footing as we poked the starter bars in 200mm under the top layer of mesh.


With the pour complete, I found out about the downside of using a pump when Chris dropped about .2 M3 of concrete on the driveway to clean out the hopper.  The large grey section in the photo above is the result of shoveling into the barrow, then shoveling into the fill area.  Must admit I was not physically prepared for this task, but managed to complete it before the concrete went off.  Even with this, the pump was a back saver, it makes it just so much easier and faster.

As an observation, I understand why most trades like to knock off around three, as the Builder gets to clean up, pack up and make the site safe and secure, these tasks have seen me have an extended series of 12 hours days.  I have lost 4 kilos in two weeks however.  If I survive, I might even get fit.

Blocks are ordered and will be delivered on Tuesday, brickie is keen to start, and in discussions with the plumber.

All up I am pretty pleased with myself.

Siteworks

Finally the work can start.  Australian Standards require that we move the driveway, as entering an intersection at a 45 degree angle no longer complies.  Far South Coast excavations were engaged to undertake excavation and general siteworks.


There is also the matter of the logs awaiting the arrival of a portable mill.


The poor little machine worked very hard on the day, it really was too small.  It struggled scratching out the existing driveway, so the following day a 5 tonner arrived on site, and then progress happened.


There is between 300 and 400mm of good topsoil on our block, stored for future use, but I doubt that we can use all of it.  With the topsoil scraped away, a few trees moved, footing excavations could start.


Of course, no job would be right without a visit from Murphy.  Hydraulic hose failures saw work spread over a three days, with a level of frustration.  Finally we ended up with trenches and pier holes.  The footings ended up slightly over the engineer spec, and there was almost enough to do the fill.


Finished at last, well sort of.  Will need to get machinery back on site to complete and compact fill and generally clean up.

Wednesday 21 September 2016

Fees and Charges - how to go broke quickly

There is no doubt that municipal authorities have mastered the art of tax collection, as each step brings to light yet another non-optional financial contribution.  Between headworks (the work required by the council to bring sewerage and water to the block), lodgement fees for the Development Application, Section 94 donations and other assorted fees the tally has exceeded $40K.

On top of this we have almost $4k for the draftsman, $2.4K for the engineer, $3.5k for tree removals, $3K for temporary fencing, so another $12.5K looks like we will hit > $300K to deliver the shed.

Over $50K and we still haven't dug a hole to throw money into............

Tell me again about the incentives for folks to build a new home, and why it is that the housing prices are so steep.

The shed on a slab will consume about $32K without electrical or plumbing.

The world conspires..........

So work has come to a screaming halt before we really got started.  Family must come first, so with both of the olds having their own set of issues I am off to Tassie until whenever.

A matter of priorities, and being there for my Mum during her palliative care is both rewarding and mind destroying.


The first real milestone - Construction Certificate

So after finding out that I have to provide engineered drawings for all structures prior to a construction certificate being issued, a trip to the engineer was in order.

Last time I went through this it was acceptable to quote compliance with standards, but that would require the certifying authority to know and understand the application of the standard.

So another $2500 disappears from the balance sheet.

We have received the construction certificate to allow the shed/studio slab to be completed, and the construction certificate for the remainder of the shed will be issued once engineered drawings are provided by the shed supplier.

Profiles have been put in place, and the site has been fenced to stop unauthorised access.  Apparently it is my responsibility if some dickhead goes poking around and impales himself on a star picket.


Gotta love Google Maps

Google Maps view

Click on the link above to get an idea where we are going to be

Tree removal

Making our site safe was the highest priority, and on receiving recommendations from the arborist, we lodged a tree plan for the removal of the swamp mahogany and ironbark on the block.  Approval was granted and we engaged High Times Tree Services from Eden to undertake the work.  Can only recommend these guys, they did a great job at a reasonable price.

This triggered a reaction from the greenies in the area, and apparently we are just "c*#t$".  I am always amazed at how other people feel that they have precedence in the decision making for land that they are not the owners of.  The trees were assessed as dangerous, and would have posed some expensive challenges in running services, and would have precluded building the chosen design on the site due to overshadowing resulting in a failure of the NaTHERS asessment (that is another story in it's own right).


It is not as though there is a shortage of greenery, but the site is now safe and manageable.  The growth shown is between the southern boundary and the lake.  The council has advised that at least two of the larger eucalypts are tagged for removal due to rot and instability.

the trees removed are those in the right hand side of the photo above.

While there are a couple of barrells that will be milled into slabs, the remainder was either chipped or cut into firewood.  I recovered several burls that will be put aside for later, although seven of the eight were termite infested.  Two termite nests were destroyed, and each of the trees had their own issues with rot, unstable root systems and limbs that were only held on by sap.

A range of bird attracting natives will be planted along the eastern boundary once the structure is locked up.


Boxes in boxes

There is a cost associated with almost any design element.  Building boxes is quicker and cheaper, but boxes can be boring.

We are working to a budget that we already know will be insufficient to finish the house outright and will require several months of saving to allow the finishing touches required for certificate of occupancy to be issued after we have the structure locked up.

We were both keen not to be guilty of building a boring box, but acknowledging the constraints, we used some "tricks" to provide an architectural style while containing costs.  The result of this is a double facing skillion with a flat roof in between over a connecting "tunnel".

A conscious decision was made not to enclose the subfloor, and the opposing skillions make for an attractive (to our minds at least) roofline.  The north and south perspectives are a bit basic, but not visible to passers by as such.  The view from the NE/SE will be what is seen from the road reserve as the studio and shed obscure the street frontage and provide complete privacy.


Floorplan

Floorplan and layout

So here is the bit that everyone wants their two bobs worth thrown in.

The design has two north facing bedrooms, the master with ensuite and walk in robe, and the centrally located activities room has potential as a third bedroom with the addition of a small amount of non structural framing.

As a couple we felt that we would get better value from the space in the configuration shown.

It is anticipated that the ensuite will see the heaviest traffic, with the main bathroom being used by visitors.  This is reflected in the amount of floor space dedicated to each wet room.

While the western aspect of the activities room has a glass sliding door, this is shaded year round by the 7m plus Jacarandah and the neighbouring residence.


The design offers two outdoor living spaces, with a south facing alfresco area of some 36 m2 with a 3/4 coverage under the roofline, and an open 16m2 area on the western side whcih faces into a fernery and is shaded by mature trees.  The western facing area will provide a sheltered outdoor are when the southerlies are blowing.

The placement of windows and doors achieves a view of the lake from every room, and the western area has access from three rooms as well as stairs to the north eastern corner.  This will provide a short distance for incoming groceries and allow ease of movement for all furniture items.

The laundry is under the main floor, and there is a WC under the stairwell.  This means that there is a clear 2.4m of space under the living area with internal access and plumbing.  Future extensions if required can be achieved at relatively low cost, and the area will provide storage and hobby areas as well as a sheltered entertaining area.

The kitchen/living area has vaulted ceilings, starting at 2.7m and rising to 3.6m on the northern face which has high set clerestory windows for winter sun and summer ventilation.

Shed and Studio elevations

The compromise we arrived at in response to the objections about the size and scale of the shed and studio were;
  1. Reduced the floor are by 8 m2 to fall within the SEPP (State Environment Planning Policy)
  2. Reduced the maximum overall height by approximately 1.4 metres, a decision I know I will live to regret.
  3. Split the design into two components, one a 9m x 4m skillion that will accommodate the 3.6m clearance required to the bottom of the roller door, the other an 8m x8m gable section, with a one metre setback to provide architectural relief and empathy with the roofline of the house.

The result is a maximum height of 4.8 metres on the front of the skillion to maintain a 10 degree pitch and not "break the roofline" where the two structures adjoin.

The structure is set back 10m from the front boundary to reduce the perceived bulk and height, and additional plantings have been requested.

The 10 degree pitch will also be a better proposition for solar panels.


Updated site plan and driveway positioning

Amending the shed


So everything was looking sweet, I had met with the Building Inspector and discussed sizing requirements for our shed, lodged plans and on the final day, one of the neighbours objected to the size, scale, positioning and access to the shed.


A second round of discussions with the building inspector acting as an intermediary to the planning department and concessions were made to reduce the floor area and overall height.  We engaged the draftsman to revise the plans and we resubmitted.

At this time we received a verbal indication that the revised design was acceptable, and then the building inspector changed jobs, so back to square one, and back through the design cycle once more.

Having finally satisfied the planning department, the plans were resubmitted to the shed providers, with a resounding response of "computer says no" due to the irregular floorplan and reduced roof pitch not meeting engineering requirements for the spans involved.

Met with the Shed Provider who felt that with minor changes we could get to a suitable design, namely an increase in roof pitch to 10 degrees from the proposed five.

A fourth discussion with the council saw a compromise reached where the increased roof angle can be accommodated with a further reduction in wall height of 300mm resulting in a maximum height of 4.8m at the front of the skillion and a 3m wall height for the rest of the structure.

The layout is as per this drawing showing the amended floorplan and driveway location.


Site Layout - initial

Site Layout


Lake views this end

The garage shown is not the final design, the footprint has been reduced to 100 m2

The residence is sited 6m from the western boundary and 3.5m from the southern boundary.

Site Layout - initial

Site Layout


Lake views this end

The garage shown is not the final design, the footprint has been reduced to 100 m2

The residence is sited 6m from the western boundary and 3.5m from the southern boundary.

Designing and Planning

Design Objectives


  1. Amenity of Lake view maximised
  2. Retain existing mature ornamental and native species where possible
  3. Open, light and airy
  4. Structure within the scope of my building and carpentry skills
  5. High ceilings and generous proportions to rooms
  6. 2 Bedrooms
  7. Amenity of existing mature Jacarandah tree
  8. Open plan living and kitchen
  9. Not a box with a hip roof
  10. Lightweight construction
  11. Sufficient space to store a boat, maintain a hobbyist woodwork studio and still have room for motorcycles and associated tools
  12. Privacy from the street

Design Constraints

The block is a corner block, with a north facing street frontage, a road reserve on the eastern boundary, South East and South West Lake views, with a mature Jacarandah on the western boundary which adjoins the neighbouring residence.

The block slopes downhill to the Southern boundary at a rate of 1:10

Several large eucalypts/swamp mahogany and an Iron Bark along the eastern boundary, each displaying deterioration and disease affecting safety of users of the road reserve, with another located on the Western boundary that has been pollarded presenting a threat to the neighbours structure.  An Arborist was engaged to undertake an inspection and removal of all of these trees has been recommended. 

The block is 18.5 metres wide, and 55 metres deep.

Soil class has been identified as Class M with a sandy clay substrate.

The existing driveway was thought to be serviceable, however advice from the Municipal Engineering authority has advised that it is non-compliant with existing standards.  

The southern boundary is approximately 10-15 meters from the lake edge, although it sits at least 4 metres above the the normal high water mark. 

Introduction

This blog has been created to record our journey to build our home at Wallaga Lake.

The journey started in the first week of January 2016 while staying at our onsite van at Wallaga Lake Park.  We had been looking at blocks of land, and had become enthused about a block at Cobargo with a 140 m2 Barn style shed.  On inspection we found that the layout and profile of the block made it unsuitable to be able to store our fishing boat.

Disappointed we headed to camp, only to receive an email advising that there was a 1062 m2 lakefront block come on the market on the beauty Point peninsula.  We went and looked the next morning and made a few calls to get an idea of what hidden costs we would face, and armed with that information we contacted the Real Estate Agent and negotiated a mutually acceptable price.

Contracts were exchanged and settlement occurred on the 16th February.

The design process has consumed some time, and much discussion has been had about the final product.  The theme will be 50 Shades with at least 8 being used on the studio and shed alone.

Posts on this blog commence in September, and there are a few "catch up" posts to fill in the gaps.